-40%
4 Ch Hopping Code HCS301 Decoder Modules ASK OOK UHF Transmitter Key Fob 433MHZ
$ 5.27
- Description
- Size Guide
Description
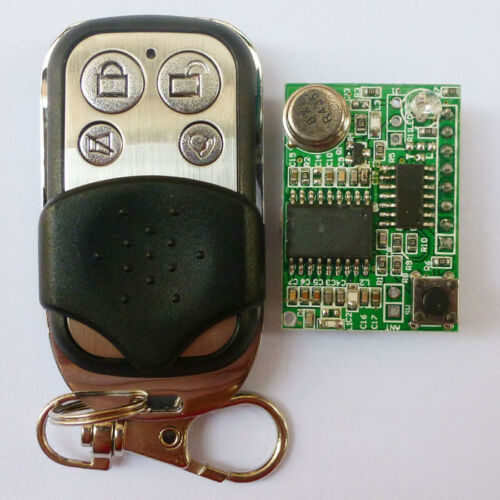
4 Ch Hopping Code HCS301 Decoder Modules ASK OOK UHF Transmitter Key Fob 433MHZ1 pcs Receiver module and 1 wireless key fob.
( This Key fob doesnot have a battery inside )
Demo :
Receiver module :
Model No.
CN0001
Function discription
superheterodyne receiver modules,car temperature range, learning type hopping rolling code.1 receivers can works with 4 remotes , or 1 remotes can control 4 receivers .
Operating voltage
5.0VDC ±0.5V
Static current
≤11 mA (DC 5V)
Operating frequency
433MHz
modulation Mode
ASK/OOK
Receiving sensitivity
over -105 dBm (50 Ω)
Speed
< 5 K bps (at 315 MHz, -95 dBm)
Operating temp.
-20 °C ~ +70 °C
Antenns length
24 cm (315 MHz), 18 cm (433.92 MHz)
Dimension
34 * 24mm
Decodeing format
Simply format
Output signal
TTL level ,
4 chanel output ,Momentary, Latch, Toggle
,user can set it .
Band width
1MHz(315MHz, Sensitivity go down 3dBm test )
Feature :
a: Support our own HCS301 transmitter remote ;
b: Auto-detect b
aud rate;
c: Can learn 40 pair remote controller receiver module ;
d: L4,M4 , T4 output ;
e:
Anti-interference
missing
code;
Output
A.singnal inter-locking (Latch ) ----connect 2 &
3 ;
B.singnal non-locking (Momentary) ---- all disconnect ;
C.singnal self-locking (Toggle) ---- connect 1 and 2 ;
Momentary-
-----------Press the Transmitter button A, the receiver relay A is ON, release button A; the receiver relay A is OFF, the same as B/C/D ,Every channel is
Independent
;
Toggle
---------------Press transmitter button A for 1 time , the receiver relay A is ON, press button A again, the receiver relay A is OFF, the same as B/C/D.
Every channel is
Independent
;
Latched
------------------
Press transmitter button A, the receiver relay A is ON, the relay B/C/D is OFF.
Press transmitter button B, the receiver relay B is ON, the relay A/C/D is OFF.
Press transmitter button C, the receiver relay C is ON, the relay A/B/D is OFF
Press transmitter button D, the receiver relay D is ON, the relay A/B/C is OFF.
It also mean .Latched only can keep 1CH ON .and it will often have 1CH is ON.
User guide :
1: Learing ID : Press learning button , LED is on and beginning to learn ;after learning , LED will flash for a while .Then LED will keep being on to learn the next remote. If perss the learned remoter controller , auto-quit learning within 10 seconds;
2: Delete ID : Keep pressing learning button for 5 seconds , LED will be on and enter deleting . LED off means finishing deleting;
3: Antenna with a soft wire or other hard metals (such as whip antenna), try to straighten. Do not go near metal objects;
4: Power supply voltage requires stable and low ripple factor, multi-level filtering (such as adding beads, inductors, capacitors, etc.);
Application:
1.4 bits data wireless receiving,anti-theft alarm signal decoding.
2.Indusrial remote control,telemetry,remote sensing
3.All kinds of appliances, rolling code,hopping code, high security.
4. Car temperature range
5.It can decode our own HCS301 coding chips ,and can learning and save 15 transmitter encoder .
Transmitter key :
Transmitter
Module No.:
XLC-YK01-433
Technical Data :
Transmitter
Module No.:
XLC-YK01-433
Power supply : 12V 27A battery
replacable
.
(This remote doesnot have a battery , Please buy in your local market )
Operating current:
≤ 9mA;
Oscillation mode:
SAW resonator;
Modulation mode:
ASK;
Operating frequency:
433.92MHz ,
Special frequency can be customized;
Frequency deviation:
± 150Hz (max);
Encoding format: Hopping Code (
HCS301) ;
(CANNOT program, HAVENOT Cloning Function , Cannot copy your existing remote ,CANNOT be duplicate EVEN your receiver board have a learning key )
;
Transmit power:
10 mW.
Typical Applications
• Automotive RKE systems
• Automotive alarm systems
• Automotive immobilizers
• Gate and garage door openers
• Identity tokens
• Burglar alarm systems
----------------------------------------------------------------------------------------------------------------------------------------------
Keyfob Deadbolt
with Arduino uno R3 and RF transmitter and recei
ver
Intro :
The key to my apartment never worked quite right because it is a copy of a copy of a copy. I am fairly certain that the dead bolt is original to the building and the property manager seems to have lost the original key years ago. As a result unlocking the door was always a pain. Changing the lock wasn't an option, but eliminating the need to use a key was.
Parts:
Arduino Uno R3
Servo
2 Push Button Switches
Red LED
Green LED
Various Resistors
piezoelectric speaker
Perf Board
Step 1 :
Mounting Parts
I used a couple of pieces of acrylic that I acquired in the dumpster of the plastic shop next to my place of work (they throw out alot of small pieces like this). Alternatively another material could be used if you don't have access to acrylic, but it is easy to work with and looks cool.
Using a piece of paper trace the mounting holes for your dead bolt and transfer them onto your acrylic sheet. Since most dead bolts are going to be slightly different I am not sharing the template I made out of a piece of paper (mainly because it isn't anything worth sharing).
Leave the paper covering on while working with the acrylic. The paper makes it easy to mark where to cut/drill as well as protects the material from scratches. Once all of your cuts are made and your holes are drilled you can start installing components such as LEDs and switches.
Step 2:
Servo
I used an old parallax servo I had in my parts bin. This small servo is more than strong enough to turn the deadbolt. In order to attach the servo to the lock shaft I used epoxy putty. Epoxy putty is very easy to use and is extremely versatile. The wire you see sticking out of the putty will be used as the arm for the limit switch.
At some point the wires to my servo had been cut so I had to open the case and solder on new ones. I took that opportunity to solder on a second wire to the 5v line and connected it to the limit switch arm.
Step 3:
Wiring
Screws were countersunk from the back of the acrylic. A wire was attached to each screw and then to a digital pin on the Arduino. When the wiper with the 5v wire touches the screw it pulls the digital pin high on the Arduino. Please see the schematic for further details.
Step 4: Program
Disclaimer: I am not a programmer and therefore the below code may not be the most efficient. Feel free to improve the code for your own uses if you see any errors or problems. It works for me so I hope it works for you.
// turn CW to lock and CCW to unlock
//1700 CCW; 1500 Stop; 1300 CW
//written by Chris Rybitski
#include
Servo deadbolt; // create servo
const int CWLimit = 6; // Limit Switch on 6 Unlock
const int CCWLimit = 7; // Limit Switch on 7 Lock
const int Redbtn = 12; //red push button
const int Blackbtn = 8; //black push button
const int GreenLED = 10; // Green LED
const int RedLED = 11; //Red LED
const int Ch1 = 5; //rf channel 1
const int Ch2 = 4; //rf channel 2
const int Buzz = 9; //buzzer
int Unlock = 0;
int Lock = 0;
int timer = 0;
boolean UnLcomplete = false;
boolean Lcomplete = false;
void setup()
{
Serial.begin(9600);
deadbolt.attach(3); // attaches the servo
pinMode(GreenLED, OUTPUT);
pinMode(RedLED, OUTPUT);
pinMode(Buzz,OUTPUT);
pinMode(CWLimit, INPUT);
pinMode(CCWLimit, INPUT);
pinMode(Redbtn, INPUT);
pinMode(Blackbtn, INPUT);
pinMode(Ch1, INPUT);
pinMode(Ch2, INPUT);
//set LED's and Buzzer to be off by default
digitalWrite(GreenLED, HIGH);
digitalWrite(RedLED, HIGH);
digitalWrite(Buzz, HIGH);
}
void loop()
{
if (digitalRead(Ch1) == HIGH || digitalRead(Redbtn) == LOW){ //If remote or button is pressed
if(UnLcomplete == false){ //dont run unlock if door is already unlocked
Serial.println("UnLock");
Unlock = 1;}}
if (digitalRead(Ch2) == HIGH || digitalRead(Blackbtn) == LOW){ //If remote or button is pressed
if(Lcomplete == false){ //dont run lock if door is already locked
Serial.println("Lock");
Lock = 1;}}
//---------------UNLOCK-------------------------
if (Unlock == 1){
timer = 0;
while (digitalRead(CWLimit) == LOW){
if (timer > 1500){
digitalWrite(Buzz, LOW);
delay(500);
digitalWrite(Buzz, HIGH);
}
else{
deadbolt.write(1700);
timer++;
delay(1);
}}
deadbolt.write(1500); //servo stop
digitalWrite(RedLED, LOW);
digitalWrite(GreenLED, HIGH);
UnLcomplete = true; //unlock complete
Lcomplete = false; //reset Lock boolean
digitalWrite(Buzz, LOW);
delay(100);
digitalWrite(Buzz, HIGH);
Unlock = 0; //reset
}
//--------------LOCK----------------------------
if (Lock == 1){
timer = 0;
while (digitalRead(CCWLimit) == LOW){
if (timer > 1500){
digitalWrite(Buzz, LOW);
delay(500);
digitalWrite(Buzz, HIGH);
}
else{
deadbolt.write(1300);
timer++;
delay(1);
}}
deadbolt.write(1500);
digitalWrite(GreenLED, LOW);
digitalWrite(RedLED, HIGH);
Lcomplete = true; //lock complete
UnLcomplete = false; //reset Lock boolean
digitalWrite(Buzz, LOW);
delay(100);
digitalWrite(Buzz, HIGH);
delay(50);
digitalWrite(Buzz, LOW);
delay(100);
digitalWrite(Buzz, HIGH);
Lock = 0; //reset
}
}
